OSPF与BFD联动特性配置

Clevebitr Lv2

本实验使用ensp仿真模拟器配置

OSPF与BFD联动

如果需要提高链路状态变化时OSPF协议的收敛速度,可以在运行OSPF协议的链路上配置BFD特性。
当BFD检测到链路出现故障时,能够将故障通告给路由协议,触发路由协议的快速收敛;当邻居关系为Down时,将动态删除BFD会话。

实验目的

OSPF通过周期性发送Hello报文来实现邻居检测,检测到故障的所需时间比较长,超过1s。在使用高速网络时,会丢失大量数据。
为了解决上述问题,配置指定进程或端口的BFD for OSPF特性,可以快速检测链路的状态,故障检测时间可达毫秒级,提高链路状态变化时的收敛速度。

实验设备

华为AR2220三台

实验拓扑
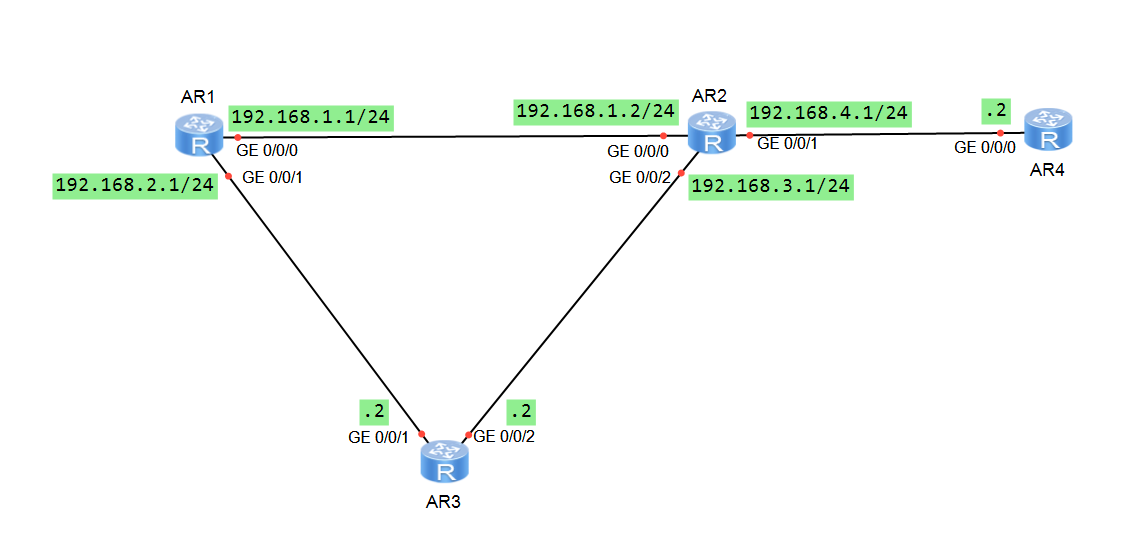
实验拓扑

基础配置

  1. 改名,改密码,关闭信息中心。
    AR1:
    1
    2
    3
    4
    5
    6
    <Huawei>sy
    Enter system view, return user view with Ctrl+Z.
    [Huawei]sy R1
    [R1]un in en
    Info: Information center is disabled.
    [R1]
    AR2:
    1
    2
    3
    4
    5
    6
    <Huawei>sy
    Enter system view, return user view with Ctrl+Z.
    [Huawei]sy R2
    [R2]un in en
    Info: Information center is disabled.
    [R2]
    AR3:
    1
    2
    3
    4
    5
    6
    <Huawei>sy
    Enter system view, return user view with Ctrl+Z.
    [Huawei]sy R3
    [R3]un in en
    Info: Information center is disabled.
    [R3]
    AR4:
    1
    2
    3
    4
    5
    6
    <Huawei>sy
    Enter system view, return user view with Ctrl+Z.
    [Huawei]sy R4
    [R4]un in en
    Info: Information center is disabled.
    [R4]
  2. 配置IP地址
    R1:
    1
    2
    3
    4
    [R1]int g0/0/0
    [R1-GigabitEthernet0/0/0]ip add 192.168.1.1 24
    [R1]int g0/0/1
    [R1-GigabitEthernet0/0/1]ip add 192.168.2.1 24
    R2:
    1
    2
    3
    4
    5
    6
    [R2]int g0/0/0
    [R2-GigabitEthernet0/0/0]ip add 192.168.1.2 24
    [R2]int g0/0/1
    [R2-GigabitEthernet0/0/1]ip add 192.168.4.1 24
    [R2]int g0/0/2
    [R2-GigabitEthernet0/0/2]ip add 192.168.3.1 24
    R3:
    1
    2
    3
    4
    [R3]int g0/0/1
    [R3-GigabitEthernet0/0/1]ip add 192.168.2.2 24
    [R3]int g0/0/2
    [R3-GigabitEthernet0/0/2]ip add 192.168.3.2 24
    R4:
    1
    2
    [R3]int g0/0/0
    [R3-GigabitEthernet0/0/0]ip add 192.168.4.2 24
    2.配置OSPF
    R1:
    1
    2
    3
    4
    [R1]ospf 1 r 1.1.1.1
    [R1-ospf-1]a 0
    [R1-ospf-1-area-0.0.0.0]n 192.168.1.0 0.0.0.255
    [R1-ospf-1-area-0.0.0.0]n 192.168.2.0 0.0.0.255
    R2:
    1
    2
    3
    4
    5
    [R2]ospf 1 r 2.2.2.2
    [R2-ospf-1]a 0
    [R2-ospf-1-area-0.0.0.0]n 192.168.1.0 0.0.0.255
    [R2-ospf-1-area-0.0.0.0]n 192.168.3.0 0.0.0.255
    [R2-ospf-1-area-0.0.0.0]n 192.168.4.0 0.0.0.255

R3:

1
2
3
4
[R3]ospf 1 r 3.3.3.3
[R3-ospf-1]a 0
[R3-ospf-1-area-0.0.0.0]n 192.168.2.0 0.0.0.255
[R3-ospf-1-area-0.0.0.0]n 192.168.3.0 0.0.0.255

R4:

1
2
3
[R4]ospf 1 r 4.4.4.4
[R4-ospf-1]a 0
[R4-ospf-1-area-0.0.0.0]n 192.168.4.0 0.0.0.255

3.查看ospf配置
R1查看邻居表:

1
2
3
4
5
6
7
8
9
10
11
12
13
14
15
16
17
18
19
20
21
22
23
24
25
[R1]dis ospf peer

OSPF Process 1 with Router ID 1.1.1.1
Neighbors

Area 0.0.0.0 interface 192.168.1.1(GigabitEthernet0/0/0)'s neighbors
Router ID: 2.2.2.2 Address: 192.168.1.2
State: Full Mode:Nbr is Master Priority: 1
DR: 192.168.1.1 BDR: 192.168.1.2 MTU: 0
Dead timer due in 31 sec
Retrans timer interval: 5
Neighbor is up for 00:02:15
Authentication Sequence: [ 0 ]

Neighbors

Area 0.0.0.0 interface 192.168.2.1(GigabitEthernet0/0/1)'s neighbors
Router ID: 3.3.3.3 Address: 192.168.2.2
State: Full Mode:Nbr is Master Priority: 1
DR: 192.168.2.1 BDR: 192.168.2.2 MTU: 0
Dead timer due in 34 sec
Retrans timer interval: 5
Neighbor is up for 00:01:04
Authentication Sequence: [ 0 ]

R2查看邻居表:

1
2
3
4
5
6
7
8
9
10
11
12
13
14
15
16
17
18
19
20
21
22
23
24
25
26
27
28
29
30
31
32
33
34
35
36
[R2]dis ospf peer

OSPF Process 1 with Router ID 2.2.2.2
Neighbors

Area 0.0.0.0 interface 192.168.1.2(GigabitEthernet0/0/0)'s neighbors
Router ID: 1.1.1.1 Address: 192.168.1.1
State: Full Mode:Nbr is Slave Priority: 1
DR: 192.168.1.1 BDR: 192.168.1.2 MTU: 0
Dead timer due in 39 sec
Retrans timer interval: 5
Neighbor is up for 00:03:24
Authentication Sequence: [ 0 ]

Neighbors

Area 0.0.0.0 interface 192.168.3.1(GigabitEthernet0/0/2)'s neighbors
Router ID: 3.3.3.3 Address: 192.168.3.2
State: Full Mode:Nbr is Master Priority: 1
DR: 192.168.3.1 BDR: 192.168.3.2 MTU: 0
Dead timer due in 32 sec
Retrans timer interval: 5
Neighbor is up for 00:02:08
Authentication Sequence: [ 0 ]

Neighbors

Area 0.0.0.0 interface 192.168.4.1(GigabitEthernet0/0/1)'s neighbors
Router ID: 4.4.4.4 Address: 192.168.4.2
State: Full Mode:Nbr is Master Priority: 1
DR: 192.168.4.1 BDR: 192.168.4.2 MTU: 0
Dead timer due in 38 sec
Retrans timer interval: 5
Neighbor is up for 00:01:22
Authentication Sequence: [ 0 ]

邻居关系成功建立。
R1查看ipv4路由表:

1
2
3
4
5
6
7
8
9
10
11
12
13
14
15
16
17
18
19
20
21
22
[R1]dis ip ro
Route Flags: R - relay, D - download to fib
------------------------------------------------------------------------------
Routing Tables: Public
Destinations : 12 Routes : 13

Destination/Mask Proto Pre Cost Flags NextHop Interface

127.0.0.0/8 Direct 0 0 D 127.0.0.1 InLoopBack0
127.0.0.1/32 Direct 0 0 D 127.0.0.1 InLoopBack0
127.255.255.255/32 Direct 0 0 D 127.0.0.1 InLoopBack0
192.168.1.0/24 Direct 0 0 D 192.168.1.1 GigabitEthernet0/0/0
192.168.1.1/32 Direct 0 0 D 127.0.0.1 GigabitEthernet0/0/0
192.168.1.255/32 Direct 0 0 D 127.0.0.1 GigabitEthernet0/0/0
192.168.2.0/24 Direct 0 0 D 192.168.2.1 GigabitEthernet0/0/1
192.168.2.1/32 Direct 0 0 D 127.0.0.1 GigabitEthernet0/0/1
192.168.2.255/32 Direct 0 0 D 127.0.0.1 GigabitEthernet0/0/1
192.168.3.0/24 OSPF 10 2 D 192.168.1.2 GigabitEthernet0/0/0
OSPF 10 2 D 192.168.2.2 GigabitEthernet0/0/1
192.168.4.0/24 OSPF 10 2 D 192.168.1.2 GigabitEthernet0/0/0
255.255.255.255/32 Direct 0 0 D 127.0.0.1 InLoopBack0

路由表正常。

配置BFD

开始配置之前,先追踪一下路由,看看数据包在哪个路由器中传输。
R1 tracert R4

1
2
3
4
5
6
7
8
[R1]tracert 192.168.4.2

traceroute to 192.168.4.2(192.168.4.2), max hops: 30 ,packet length: 40,press
CTRL_C to break

1 192.168.1.2 30 ms 10 ms 30 ms

2 192.168.4.2 30 ms 20 ms 20 ms

可以看到,R1优先向R2发送数据包,因为这是OSPF计算出的最短路径。
接下来开始配置BFD。
R1,R2,R3,R4配置命令一样,以R1为例:

1
2
3
4
[R1]bfd
[R1-bfd]q
[R1]ospf 1
[R1-ospf-1]bfd all-interfaces enable

配置完成后,查看R1到R4的BFD会话表,以R1为例:

1
2
3
4
5
6
7
8
9
10
11
12
13
14
15
16
17
18
19
[R1]dis ospf bfd session al

OSPF Process 1 with Router ID 1.1.1.1
Area 0.0.0.0 interface 192.168.1.1(GigabitEthernet0/0/0)''s BFD Sessions

NeighborId:2.2.2.2 AreaId:0.0.0.0 Interface:GigabitEthernet0/
0/0
BFDState:up rx :1000 tx :1000
Multiplier:3 BFD Local Dis:8192 LocalIpAdd:192.168.1.1
RemoteIpAdd:192.168.1.2 Diagnostic Info:No diagnostic information

Area 0.0.0.0 interface 192.168.2.1(GigabitEthernet0/0/1)''s BFD Sessions

NeighborId:3.3.3.3 AreaId:0.0.0.0 Interface:GigabitEthernet0/
0/1
BFDState:up rx :1000 tx :1000
Multiplier:3 BFD Local Dis:8193 LocalIpAdd:192.168.2.1
RemoteIpAdd:192.168.2.2 Diagnostic Info:No diagnostic information

当状态为up时,代表bfd已经启用成功了。

  • 扩展:
    配置R1的GE0/0/0端口的BFD特性,指定最小发送和接收的时间间隔为300ms,本地检测时间倍数为4.
    1
    2
    3
    4
    5
    6
    7
    8
    9
    10
    11
    12
    13
    14
    [R1]int g0/0/0
    [R1-GigabitEthernet0/0/0]ospf bfd enable
    [R1-GigabitEthernet0/0/0]ospf bfd min-rx-interval 300 min-tx-interval 300 detect
    -multiplier 4
    [R1-GigabitEthernet0/0/0]dis this
    [V200R003C00]
    #
    interface GigabitEthernet0/0/0
    ip address 192.168.1.1 255.255.255.0
    ospf bfd enable
    ospf bfd min-tx-interval 300 min-rx-interval 300 detect-multiplier 4
    #
    return
    [R1-GigabitEthernet0/0/0]
    配置R2的GE0/0/0端口的BFD特性,指定最小发送和接收的时间间隔为300ms,本地检测时间倍数为4.
    1
    2
    3
    4
    5
    6
    7
    8
    9
    10
    11
    12
    13
    14
    [R2]int g0/0/0
    [R2-GigabitEthernet0/0/0]ospf bfd enable
    [R2-GigabitEthernet0/0/0]ospf bfd min-rx-interval 300 min-tx-interval 300 detect
    -multiplier 4
    [R2-GigabitEthernet0/0/0]dis this
    [V200R003C00]
    #
    interface GigabitEthernet0/0/0
    ip address 192.168.1.2 255.255.255.0
    ospf bfd enable
    ospf bfd min-tx-interval 300 min-rx-interval 300 detect-multiplier 4
    #
    return
    [R2-GigabitEthernet0/0/0]
    配置完成后,查看R1和R2的BFD会话表,以R1为例:
    1
    2
    3
    4
    5
    6
    7
    8
    9
    10
    11
    12
    13
    14
    15
    16
    17
    18
    19
    20
    [R1]dis ospf bfd session all

    OSPF Process 1 with Router ID 1.1.1.1
    Area 0.0.0.0 interface 192.168.1.1(GigabitEthernet0/0/0)''s BFD Sessions

    NeighborId:2.2.2.2 AreaId:0.0.0.0 Interface:GigabitEthernet0/
    0/0
    BFDState:up rx :300 tx :300
    Multiplier:4 BFD Local Dis:8192 LocalIpAdd:192.168.1.1
    RemoteIpAdd:192.168.1.2 Diagnostic Info:No diagnostic information

    Area 0.0.0.0 interface 192.168.2.1(GigabitEthernet0/0/1)''s BFD Sessions

    NeighborId:3.3.3.3 AreaId:0.0.0.0 Interface:GigabitEthernet0/
    0/1
    BFDState:up rx :1000 tx :1000
    Multiplier:3 BFD Local Dis:8193 LocalIpAdd:192.168.2.1
    RemoteIpAdd:192.168.2.2 Diagnostic Info:No diagnostic information

    [R1]
    可以看到,最小发送和接收的时间间隔为300ms,本地检测时间倍数为4。

测试

故意shutdown R2的GE0/0/0端口,模拟线路故障并迅速R1 tracert R4.

1
2
3
4
5
6
7
8
9
10
11
[R1]tracert 192.168.4.2

traceroute to 192.168.4.2(192.168.4.2), max hops: 30 ,packet length: 40,press
CTRL_C to break

1 192.168.2.2 30 ms 40 ms 20 ms

2 192.168.3.1 30 ms 30 ms 20 ms

3 192.168.4.2 50 ms 30 ms 30 ms
[R1]

可以看到,R1将数据包发送给了备份路由器R3,ospf以很快的速度收敛。

  • 标题: OSPF与BFD联动特性配置
  • 作者: Clevebitr
  • 创建于 : 2024-09-29 19:48:31
  • 更新于 : 2024-11-14 22:40:31
  • 链接: https://diaofanzhuye.shop/2024/09/29/OSPF与BFD联动特性配置/
  • 版权声明: 本文章采用 CC BY-NC-SA 4.0 进行许可。